As promised- here is the first installment of my new Q&A feature!
Here is a question I received from a sweet budding photographer:
Hello Jordan,
I have a question to ask if you don't mind. I think many photographers have different ideas on this topic as well. I recently photographed a Senior girl who decided to wear a bright fluorescent halter top. While the top was beautiful and really accented her skin, my camera photo came out with the color reflecting on her skin. I tried so hard to get rid of it but it wasn't happening. So my question is:
1) Does a photographer need to let their customers know what not to wear to a photo shoot? Or do they just let them come as they want?
2) is there a way to make this type of thing not happen on camera?
3) is this something you would need to fix in photoshop, or is this something that happens and you just give them what you have?
lol..
i know, i guess this is a learn as you go type thing. I've been
looking at that photo for days now trying to figure out what to do with
it. While it looks great, as a photographer, my eyes go to the bright
spot.
Again, I really thank you for your time in answering my question. I am slowly getting to where i want to be one day.
-L
Why Hello there, L!
You are right- as with every question I receive, there are probably a million different answers and every photographer might give you a different one. Thus the beauty of "individuality"! I'll answer this question (and all others) to the best of my ability based on what I would do in the situation.
1. I absolutely guide my clients in wardrobe selection! When we speak in advance, I ask what colors they are thinking of wearing and most clients actually ask for recommendations! I would definitely advise my clients to stay away from solids with a strong color cast. (This is where patterns/neutrals/and layering comes in!) ;) Anywhoo...sometimes there is just nothing we can do about what a client wears to a shoot. Maybe the outfit has a special meaning or they are going for a certain colorscape to match a room in their house. Of course there are many situations where you can not control what color the client is wearing at all (i.e. prom dresses, bridesmaid dresses, etc.) Sooo...here's what you do...
2. There is no way (to my knowledge) of avoiding color casts in camera (aside from watching the light, avoiding angles where the sun only heightens the color, etc.) *note: this does not refer to white balance, which is another topic entirely...
3. The answer lies in post processing. I use Photoshop CS6, so I will be explaining how I would go about fixing a color cast using this program. Of course, there are a hundred different ways of fixing color casts in photoshop...but this is the way I typically do it:
COLOR CORRECTING IN PS CS6
I recently did a birthday studio shoot with a bunch of florescent colored balloons. I got this one shot that I just loved, but alas, the bright orange balloon was casting an awful glare on the little girl's skin. Here is my straight out of camera (SOOC) shot:
(aside from the awful bluish tint covering the entire image (should have adjusted my white balance)...do you see the bright orange on her face and arm?)
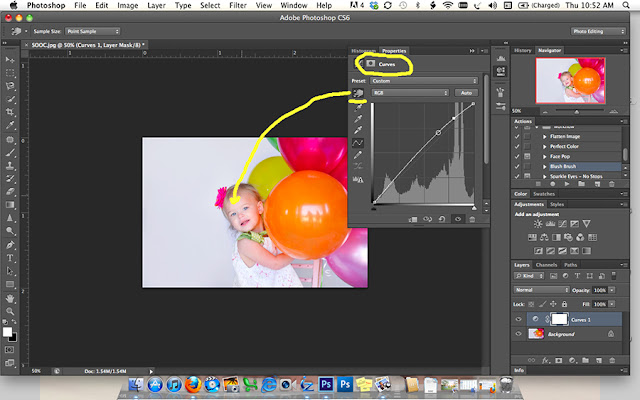
There are many things I did to correct this image, but for the purpose of this tutorial, I am going to stick to the color cast issue. The first thing I did was open up a curves layer. With the "finger"/dropper tool I selected the center of her forehead and pulled the midtones up. This just brightened my entire image up and made it easier for me to see "true to color".

The next thing I did was open up a Hue/Saturation layer. Using the "finger"/dropper tool (underlined below) I grabbed the darkest part of the color that I wanted to get rid of. In this case, the "orangest" part of the balloon. Now, you'll notice, there is no "orange" in the drop down menu, but the beauty of this feature is that whatever you select with your dropper, the hue slider will automatically select as the color it reads. In this case, it reads the orange as "red". I then lowered the saturation bar which removed almost all of the red from my image- thus making it very blue & washed out. Don't panic...that is what masking layers are for!!!
I then took my new hue layer (white box in the bottom right corner) and inverted it ("command I" on a Mac). Now we have a black box (see below) and all of our red cast came back. So we take a soft white paint brush and paint on our picture where we want the red cast removed (her face/arm).
(Always remember with masking layers: white paint brush reveals, black paint brush conceals).
In this case we want to "reveal" the hue/saturation layer we just created.
See how it takes the "orange" off her face/arm, but leaves it everywhere else in the picture? Here is a quick before & after so far:
Another option is to use your "Selective Color" tool. Think of your picture like a big color wheel. If you reduce the red, you will be lifting the blues, etc. (Did you notice how pale/blue our little girl has gotten after reducing the red in the "after" picture above? We'll want to fix that later.)
For now- let's talk "Selective Color". Since we are dealing with skin tones, you want to make sure you select "neutral" from the drop down menu. You can then fool around with the sliders until you get the desired effect. Since there is no "orange" option, I slightly reduced the magenta and the yellows.
Like with the hue/saturation layer, we want to invert the mask to black, then paint our effect back on with a soft white brush. I painted just over where the orange cast was strongest (side of her face and arm, including the edge of the balloon as well.) I adjusted the opacity to get the look I desired.
And THAT is how I would tackle a strong color cast.
Please note, that is NOT how I would finish editing this image!!
It still needs a lot of work- including fixing her skin tones, sharpening a touch, a little crop, and playing with my vibrance slider.
I've attached the final edit of this image just so you can see the different between where we left off and the end product.
While Skin Tones do fall under the "color" category- I just can't cover them here. Skin tones are a whole other tutorial...we're talking CMYKs, awesome skin-correcting actions, color balance, etc..... ;)
Final Product:
And just because I always find side-by-side B&As helpful...
I hope this has been helpful!
Feel free to share, pin or comment....and keep those questions coming!! :)
xo -J


