Wednesday, May 22, 2013

The D Family


 One of the best parts about the photography business is when your repeat clients become like friends. I just love watching the kids grow and change over time, and of course it doesn't hurt to have an excuse to see each other every few months!
I met this sweet family for the first time about 8 months ago, when the sweet Mr. B became a big brother! I can't believe how quickly time flew by and how much these two boys have changed! 
Mr. B and his ridiculously cute baby brother were two of the happiest and most well-behaved boys I've had the pleasure of working with. 
Sweet Baby F just smiled and drooled at me the entire time and Mr. B and I excitedly discussed the plans for his upcoming "Red" themed birthday party. 
(He's the cutest!)
Needless to say, we had a blast.
It was so great catching up with you, D Family.
Your family is precious to the max.
xo -j


Thursday, May 16, 2013

Ava's Lemonade Stand

When this little lady's Mama approached me about doing a Lemonade Stand Shoot for her daughter's 2nd birthday pictures I was super excited!  
 (You all know how I love me a good stylized shoot)
So, I crafted away, raided the prop garage and crossed my fingers that this little girly liked lemons!!
We were in luck!
Not only was this curly redhead A-D-O-R-A-B-L-E....
but she couldn't get enough of her special sugary drink.

 I believe I literally turned to mom at one point as we were "packing up" 
(aka: mom packing, me continuing to shoot) 
and said,
 "I'm going to need you to take your child and put her in the car now
...or I'm just going to keep shooting". 

 I literally couldn't stop!

Happy Birthday you adorable little mop-top, you! 
I hope your lemonade was as sweet as you!


Feel free to like, share, pin or leave a comment.
...it's nice to know you were here!
:)

Tuesday, May 14, 2013

Bebe W

I met the sweet B family waaay back in November (doesn't that feel like forever ago?) when an adorable French lady approached me about doing some family shots as well a baby announcement. 

This family of 3 (soon-to-be-four) was as adorable as they come. We had a fantastic shoot at which mom informed me that she'd like me to do her newborn pictures once the precious little bundle arrived. Well, over the course of the next 7 months, mom and I kept in touch. She even sent me their gender-reveal home video, which announced that they would be welcoming another little boy in May!

I was so excited to meet this precious {bebe}!

Well, as nature would have it, mom went into early labor and had the little man the night before I was leaving for my 7 day vacation!

We scheduled the shoot for the day I returned and I crossed my fingers that it would all work out.

I couldn't be happier that I met this sweet family many months ago and that I was fortunate enough to be a part of such an important event in their lives. 

Welcome to the world, sweet little Warren!


P.S. How adorable is this French Birth Announcement idea mom found! Baby's name, height, birth date & time. Weight is displayed in a clay leaf that big brother made in art class. Rosemary bundle represents mom's love of gardening and natural eating for her family. Rose represents the color of baby's nursery, and the outfit it a gift from baby's grandmother in France. So, so special! :)

Friday, April 26, 2013

Mother's Day Giveaway


I want to start off by thanking you. I am floored, touched, and honored to have read the stories that came pouring in over the past few weeks. I read stories of women so powerful, so funny, so courageous; it has been humbling to say the least. 

To those of you who submitted your story- thank you. Thank you for trusting me with your journeys, your tales of everyday struggle and happiness. It was truly courageous of you to step forward and put yourself out there and I feel honored to have read each of your stories. 
You are all amazing mommies and women!!

To those of you who nominated a friend, a family member, or just an inspiring woman you know- wow. Just, wow. You ladies are an inspiration yourselves. The way you spoke of these deserving women in your lives, the way you shared their struggles and triumphs as if they were your own, was awe-inspiring. 

To each and every single person who emailed me with a submission or a nomination- thank you. Thank you from the bottom of my heart.

I want you to know- that I took every single story to heart. I laughed, smiled, and cried along with each of you as I read your stories.
I wish I could choose you all...

This has been a difficult task to say the least. I didn't realize what I was getting myself into, what I was opening up my heart to. I honestly have thought about this for days- carried each of your stories with me- imagined living a day in your shoes.

I wanted to run this contest because Mother's Day is something near and dear to my heart. Becoming a mommy was one of the most intense struggles of my life, and when my daughter was born, my view on life was forever changed.
Q made me a mommy.
For that, I am forever bound to her and forever grateful for the opportunity to have been given such a gift,
such a miracle.

I knew, however, that I wasn't the only one out there with a story. I feel so very blessed, that I wanted to give back. To acknowledge that being a Mother isn't something that should ever be taken for granted,  over-looked, or (god-forbid!) under-appreciated! ;-)

Several of your stories touched my heart in a very familiar place. I connected with many of your journeys and felt that I could relate to your struggles and joys, having experienced some of them myself. 

There was one story, however. One story of a woman that struck such a deep cord.
This woman's path was one that I have not walked down, one that I could not imagine. 
This is a woman who is a complete stranger to me, but I can tell you this much about her:
She is stronger than I am. 

So drum roll please....

Surprise & Congratulations to 
Jenny D. 

Jenny, you are one deserving mama!! Let's go take some pictures! 
Please contact me at jmaconachy@yahoo.com to set up your session!
And thank you to her amazing cousin, Suzanne for the heart-felt nomination.

(How about a little love for Jenny, huh?
Seeing as how she's probably the most shocked about this announcement than anyone!)

:)

Love to you all, mommies or not.
xo -J

Thursday, April 25, 2013

Color Correcting

As promised- here is the first installment of my new Q&A feature!

Here is a question I received from a sweet budding photographer:


Hello Jordan, 
I have a question to ask if you don't mind. I think many photographers have different ideas on this topic as well. I recently photographed a Senior girl who decided to wear a bright fluorescent halter top. While the top was beautiful and really accented her skin, my camera photo came out with the color reflecting on her skin. I tried so hard to get rid of it but it wasn't happening. So my question is: 
1) Does a photographer need to let their customers know what not to wear to a photo shoot? Or do they just let them come as they want?
2) is there a way to make this type of thing not happen on camera?
3) is this something you would need to fix in photoshop, or is this something that happens and you just give them what you have?
lol.. i know, i guess this is a learn as you go type thing.  I've been looking at that photo for days now trying to figure out what to do with it.  While it looks great, as a photographer, my eyes go to the bright spot. 
Again, I really thank you for your time in answering my question.  I am slowly getting to where i want to be one day.  
-L

Why Hello there, L! 
You are right- as with every question I receive, there are probably a million different answers and every photographer might give you a different one. Thus the beauty of "individuality"! I'll answer this question (and all others) to the best of my ability based on what I would do in the situation.
1. I absolutely guide my clients in wardrobe selection! When we speak in advance, I ask what colors they are thinking of wearing and most clients actually ask for recommendations! I would definitely advise my clients to stay away from solids with a strong color cast. (This is where patterns/neutrals/and layering comes in!) ;) Anywhoo...sometimes there is just nothing we can do about what a client wears to a shoot. Maybe the outfit has a special meaning or they are going for a certain colorscape to match a room in their house. Of course there are many situations where you can not control what color the client is wearing at all (i.e. prom dresses, bridesmaid dresses, etc.) Sooo...here's what you do...
2. There is no way (to my knowledge) of avoiding color casts in camera (aside from watching the light, avoiding angles where the sun only heightens the color, etc.) *note: this does not refer to white balance, which is another topic entirely...

3. The answer lies in post processing. I use Photoshop CS6, so I will be explaining how I would go about fixing a color cast using this program. Of course, there are a hundred different ways of fixing color casts in photoshop...but this is the way I typically do it:
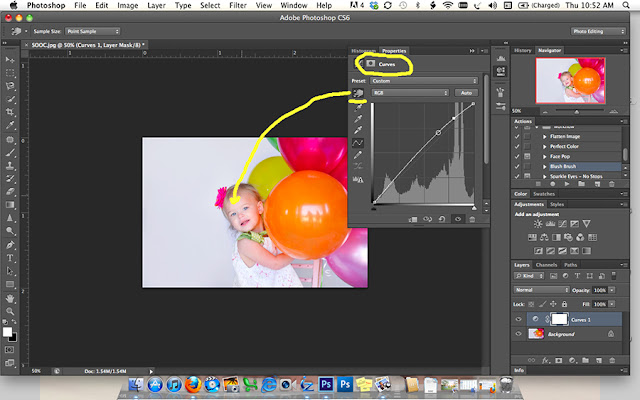
COLOR CORRECTING IN PS CS6
I recently did a birthday studio shoot with a bunch of florescent colored balloons. I got this one shot that I just loved, but alas, the bright orange balloon was casting an awful glare on the little girl's skin. Here is my straight out of camera (SOOC) shot:

(aside from the awful bluish tint covering the entire image (should have adjusted my white balance)...do you see the bright orange on her face and arm?)
There are many things I did to correct this image, but for the purpose of this tutorial, I am going to stick to the color cast issue. The first thing I did was open up a curves layer. With the "finger"/dropper tool I selected the center of her forehead and pulled the midtones up. This just brightened my entire image up and made it easier for me to see "true to color".
 
The next thing I did was open up a Hue/Saturation layer. Using the "finger"/dropper tool (underlined below) I grabbed the darkest part of the color that I wanted to get rid of. In this case, the "orangest" part of the balloon. Now, you'll notice, there is no "orange" in the drop down menu, but the beauty of this feature is that whatever you select with your dropper, the hue slider will automatically select as the color it reads. In this case, it reads the orange as "red". I then lowered the saturation bar which removed almost all of the red from my image- thus making it very blue & washed out. Don't panic...that is what masking layers are for!!!
I then took my new hue layer (white box in the bottom right corner) and inverted it ("command I" on a Mac). Now we have a black box (see below) and all of our red cast came back. So we take a soft white paint brush and paint on our picture where we want the red cast removed (her face/arm). 
(Always remember with masking layers: white paint brush reveals, black paint brush conceals). 
In this case we want to "reveal" the hue/saturation layer we just created.
See how it takes the "orange" off her face/arm, but leaves it everywhere else in the picture? Here is a quick before & after so far:
Another option is to use your "Selective Color" tool. Think of your picture like a big color wheel. If you reduce the red, you will be lifting the blues, etc. (Did you notice how pale/blue our little girl has gotten after reducing the red in the "after" picture above? We'll want to fix that later.) 
For now- let's talk "Selective Color".  Since we are dealing with skin tones, you want to make sure you select "neutral" from the drop down menu. You can then fool around with the sliders until you get the desired effect. Since there is no "orange" option, I slightly reduced the magenta and the yellows.
Like with the hue/saturation layer, we want to invert the mask to black, then paint our effect back on with a soft white brush. I painted just over where the orange cast was strongest (side of her face and arm, including the edge of the balloon as well.) I adjusted the opacity to get the look I desired.

And THAT is how I would tackle a strong color cast. 
Please note, that is NOT how I would finish editing this image!!
It still needs a lot of work- including fixing her skin tones, sharpening a touch, a little crop, and playing with my vibrance slider. 
I've attached the final edit of this image just so you can see the different between where we left off and the end product. 
While Skin Tones do fall under the "color" category- I just can't cover them here. Skin tones are a whole other tutorial...we're talking CMYKs, awesome skin-correcting actions, color balance, etc..... ;)
Final Product:

And just because I always find side-by-side B&As helpful...

I hope this has been helpful!
Feel free to share, pin or comment....and keep those questions coming!! :)

xo -J

Tuesday, April 23, 2013

Little Miss A

I met Libby several months ago when I did a Valentine's Day mini-shoot for her daughter.  We hit it off right away and joked about how similar our two girls looked. (don't you agree?)  When she approached me about doing her little lady's 2-year-old pictures, she was chock-full of ideas!

 Persnickety dresses, red poppies, ice cream....it sounded like a photographer's dream! I threw in a few ideas of my own and suddenly we were facing a 3 scene, 3 outfit change photo shoot- in just one hour's time! 
Sure, it was a bit hectic....balloons were lost, ice cream was dripping, bubbles frantically being blown...and yet, we did it!

Here are some of my favs from sweet Little Miss A's shoot. 
Happy 2nd Birthday you little Ice-Cream Queen, you! 
Wishing you lots of love... xoxo


Feel free to share, pin, like...or leave a comment!
It's nice to know that you've stopped by! :)


© JJM Photography